Build a Cheap and Easy Wooden Garage Workbench

I reckon that every man’s garage needs a decent workbench. It’s the hub of a man’s world out there, whether it’s being used on the latest project, propping up the man during a good chin wag, or holding the man’s beer, a proper garage is simply not complete without a workbench.

Since I didn’t have a workbench yet I was considering buying one from the hardware store or picking up a second hand on-line.

Buying a New Workbench

The cheapest new workbench that I could find was about $70 for an all wood basic workbench kit. The workbench came ready to assemble with the plans, hardware and timber that I would need to assemble it. The kit would probably suit my needs pretty well.

Buying a Used Workbench

Looking at used ones was a real mixed bag. There were not nearly as many listed as I would have liked, and most of those that were listed weren’t cheap. A lot of them were tradesman grade benches coming out of workshops, so they were upwards of about $300. The best priced one that I could find that might suit my purpose was for about $50.

After searching for quite some time I finally gave up on finding a decent used workbench for my garage.

Building a New Workbench

After my fairly fruitless search on-line for a workbench I starting to think that maybe I could build one, so I started another search to find the best way to do that.

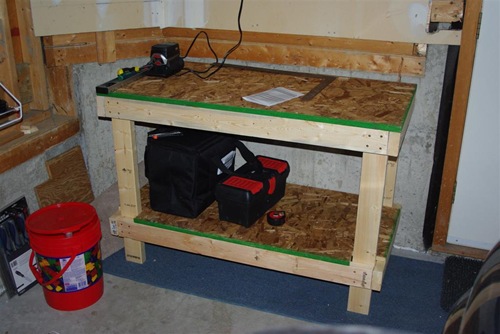
After a bit of searching I came across an article entitled “Building a Low-Cost Sturdy Work Bench from 2×4’s and OSB”. After reading that I figured that I could probably build it and end up with something pretty usable. I ended up with the workbench in the photo below, and all it took was about 2-hours of building and only $22.00 in materials!

My_20-Dollar_Workbench

The workbench top and shelf were both off-cuts that I picked up for only $2.00 each from the hardware store. They were 24” x 48”, so I based the rest the size of the workbench on that.

I then spent $10.00 on 5 x lengths of 2×4 and about $8.00 on a box of screws. Because I had the kids with me I reckon I spent nearly as long trying to buy the materials that I needed as I spent actually building it.

You can read the step by step instructions on how to build it here, but honestly, it’s super easy to build, and you end up a very sturdy and cheap workbench in the end.
House Removals – Guest Post

Our house was relocated to the current site in about the 1930’s, probably from Charters Towers about 150km West of Townsville. Also the house that we owned and renovated before this one was sold as a removal home by the developer who purchased it from us. House removals has been a fascinating process for me, especially coming from Canada where it is definitely not as common as it is here.

I’ve been talking lately with a house removalist about some of the questions that people have had on the site about house removals. He’s been active on the site answering peoples questions in the comments, so I thought I would ask him if he would like to contribute a guest post to the site about the topic. Below is the article by Guy Drake. I hope that you find it illuminating, I know that I did … Continue Reading →

Make An Inexpensive Kid’s Cardboard Kitchen

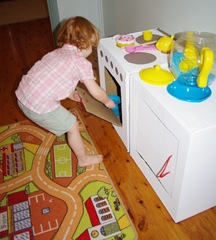
I’ve written before about wanting to build a kid’s kitchen from an old entertainment system. I haven’t gotten around to doing that, but I did make a small kitchen out of some Cardboard Boxes that my daughter Jessica loved…

Cardboard Kitchen from old packing boxesI can’t remember where I got the boxes from, but they were probably from the local hardware store. I got two that were the same size and in pretty good condition.

I primed the boxes with a 3 in 1 primer / sealer / undercoat that I had left over from when I undercoated the house. The boxes were taped together using normal clear packing tape, which the paint didn’t take to all that well. In retrospect I should have re-taped it using a cloth tape or even a masking tape.

After undercoating the boxes I put on two coats of flat white ceiling paint. You can use any paint that you have sitting around, but I had a lot of this left over, so it worked …

IMGP4300

After the paint had dried I drew out the pattern that I wanted for the burners and over door on the first box, and the cupboard and sink that I wanted on the second cardboard box. I used a saucepan lid and a milk bottle cap to make the circles round.

Using the “donkey” colour of paint that we had left over from painting the living room, dining room, kitchen and office upstairs I painted in the patterns that I had drawn out before. I also cut a hole in the “cupboard box” for the sink and put in a plastic bowl.

For the doors to the oven and the cupboard I just cut it out with a knife and then used some old string that I had lying around for the handles. To accent the door to the oven a bit more I painted around it with the same donkey colour of paint.

All up this little kitchen, that Jessica loved to play with, cost nothing as the boxes were free and the paint was all left over. It did take me a few hours to paint, but it was well worth the effort.

House Available for Removal in Sydney

I got this e-mail from someone in Sydney …

Allan Zhong wrote:

I have a fibrate house in Sydney that we want moved away. I’m wondering, do you want it?

I am guessing that they meant a “fibro” house for removal in Sydney.

I have no need or want for the house, but I thought that I would put it out there in case there is someone else out there who might want it. If you do then just put a comment below and I can put you in touch with Allan so that you can discuss the removal of the house.